Requirements
This page lists the recording-rig hardware – the exact components used in the Princeton Neuroscience Institute (PNI) Falkner/Murthy setup – and the recording software to install per machine, before running usv-playpen for behavioral recordings. Hardware is grouped by modality (audio, video, e-phys [electrophysiology]); software by machine (audio, video, e-phys PCs), followed by usv-playpen’s own credential setup. The data-processing, analysis, and visualization stages are platform-independent and need none of this recording hardware.
Recording hardware
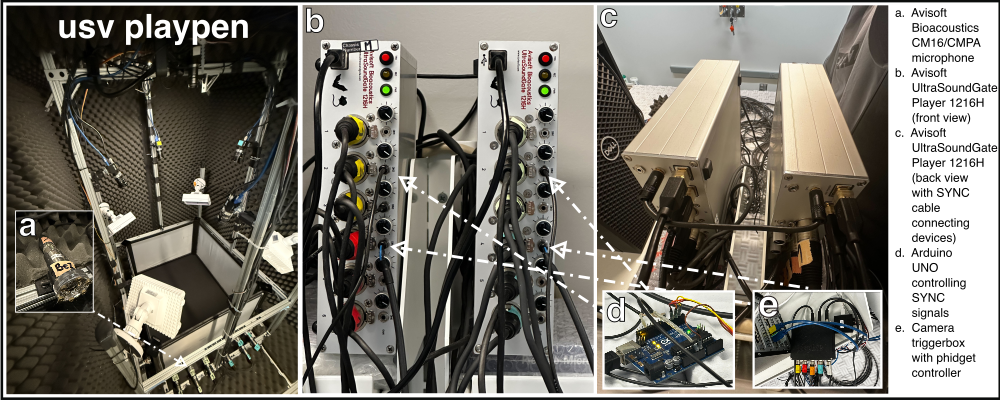
Audio
Dell Precision 3680 Tower Intel(R) Core(TM) i9-14900 CPU @ 2.00 GHz and 64 GB RAM (1x)
Avisoft UltraSoundGate Player 1216H (comes with SYNC cable) (2x)
Avisoft 40011 CM16/CMPA microphones (come with XLR-5 extension cables) (24x)
Sound permeable mesh (10ft)
Video
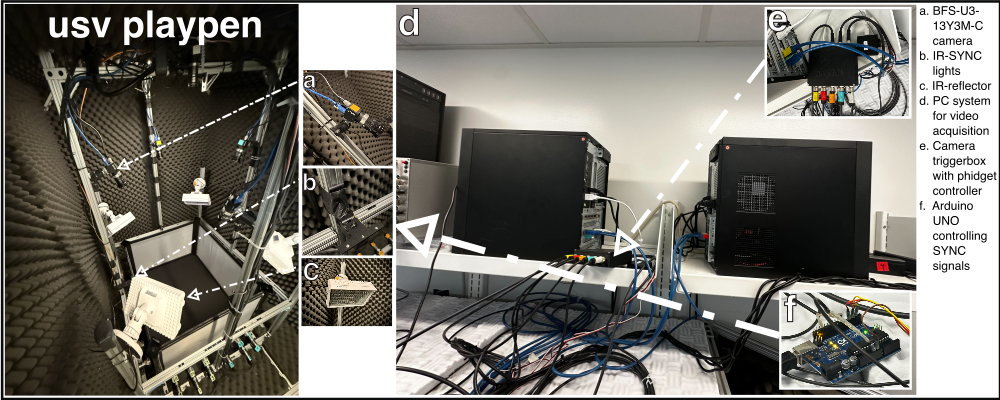
BFS-U3-13Y3M-C (5x)
Overhead lens 8mm or 8.5mm lens for 1/2” sensors HF8XA-5M (1x)
Light phidget (1x)
Loopbio Triggerbox with 5 Trigger Ports and 8 State Ports (1x): comes with Binder (3-pole) connectors for triggering cameras (5x), and Binder (6-pole) connectors for synchronization with external hardware (8x)
E-phys
Other
Arduino Uno (1x)
IR-LEDs (3x)
IR-reflectors (4x)
Raspberry Pi 4b (1x)
HiFiBerry DAC2 PRO (1x)
SA1 Stereo Amplifier (1x)
3.5mm Female Jack to Bare Wire Open End TRS 3 Pole Stereo 1/8” 3.5mm (1x)
BNC Male Balun Connector to 2 Screw Camera Terminal Male Adapter (1x)
Magnets for earbud mount (10x)
Intel Ethernet Converged X710-DA2 Network Adapter (X710DA2) for high speed ethernet (2x)
Intel E10GSFPSR 10G SFP+ SR SFP for high speed ethernet (2x)
Recording software
Audio PC
Whatever operating system you are using, you will need to ensure the existence of the following software prior to using usv-playpen: (1) git (and add PATH to USER VARIABLES on Windows), (2) uv, the uv Python package manager (and add PATH to USER VARIABLES on Windows).
You can verify that the installation was successful by running the following commands in the terminal:
git --version
uv --version
Avisoft Recorder USGH works on Windows 11. You should download a version of the software that does not require an USB license key. There is a known issue that the configuration file can occasionally contain invalid settings that lead to various unexpected behaviors. This potential issue can be avoided by disabling the automatic saving of the configuration when the program is closed (Options > Configuration management > Save mode on exit > Save current configuration automatically). CoolTerm is a serial port terminal application, which allows you to record and keep Arduino print statements in the form of a text file. In the usv-playpen/_config directory, you can find a CoolTerm configuration file, coolterm_config.stc, which you can import into CoolTerm. If you are setting CoolTerm up for the first time, it is best to unpack it in D:\CoolTerm and further create two directories: D:\CoolTerm\Connection_settings (place the coolterm_config.stc file here) and D:\CoolTerm\Data. Open the config file in CoolTerm and ensure that the location of saved files is D:\CoolTerm\Data and not D:\CoolTerm. An additional important point to consider is which port to set it to (by default it is set to COM7). If you are using the existing Arduino UNO, it is sufficient to plug it into a port (ideally COM7, which would require no changes to the CoolTerm configuration file), as the sketch was already uploaded. However, if you want to upload the sketch to a different Arduino device, you will need to install the Arduino IDE, compile and upload the following sketch: usv-playpen/src/usv_playpen/other/synchronization/generate_sync_pulses.ino.
To control Ethernet connection status from the command line (more on this in the Record section), one needs to run Powershell in administrator mode. To ensure Powershell is in administrator mode all the time: (1) find Windows PowerShell in windows search and pin it to task bar, (2) right-click on the icon in the task bar and right click again on Windows PowerShell, (3) in the Properties, go to advanced properties and select run as administrator and hit OK. When you open PowerShell, it should say administrator in the title bar. To check if you are in administrator mode, type whoami and hit enter. If you are in administrator mode, it should say administrator. It is also important to check the the file server is mounted to the PC. You can check all the mounted file systems with the following command:
gdr -PSProvider 'FileSystem'
If the file server is not mounted, you can mount it with the following command:
net use f: \\cup\falkner /user:username@princeton.edu password /persistent:yes
net use m: \\cup\murthy /user:username@princeton.edu password /persistent:yes
One can also enable/disable the Ethernet connection with:
netsh interface set interface "ethernet_network_name" enable
Video PC
There are two PCs running Ubuntu 18.04 LTS controlling camera acquisition with Motif. Three cameras are connected to the main PC, and two are connected to the secondary PC via the USB3 Micro-B Locking Cable. The main PC is connected to the Loopbio Triggerbox and each camera is connected to the Triggerbox via the 6-pin GPIO cables. If necessary, one can remote into each of the PCs using SSH. To do so, you need to know the password of the PC you want to connect to and have a stable VPN connection. You would connect in the following way:
ssh labadmin@pni-<MAIN_PC_ID>.princeton.edu
ssh labadmin@pni-<SECONDARY_PC_ID>.princeton.edu
If Motif is experiencing issues, it can be restarted on any PC with the following command:
sudo systemctl restart supervisor.service
but the user then needs to connect to the Motif web interface and manually ensure that all the cameras are connected and ready for recording.
Another thing that needs to be ensured prior to recording is that the file server is mounted to the PC. You can mount the file server with the following command:
//cup.princeton.edu/famousprof /mnt/famousprof cifs noauto,x-systemd.automount,credentials=/root/.credentials,iocharset=utf8,rw,file_mode=0664,dir_mode=0775,nolinux,noperm,vers=2.1 0 0
The video data is saved in /mnt/DATA of each computer.
E-phys PC
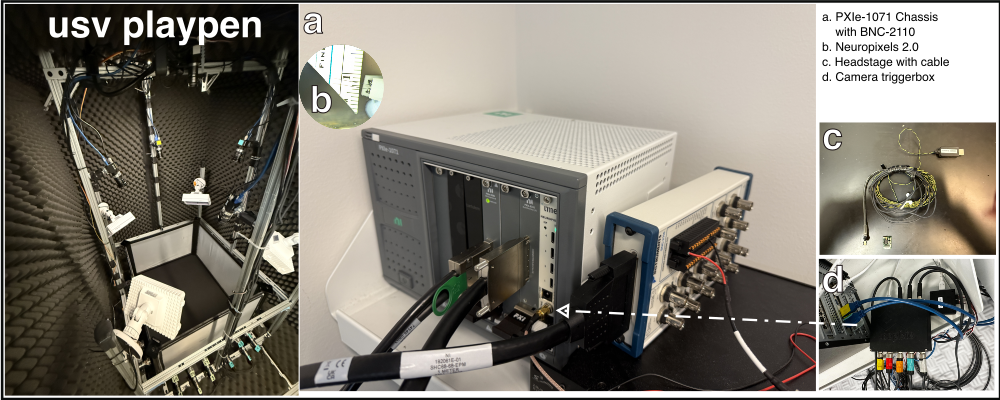
On the firmware/software side, install the following (note that the SpikeGLX acquisition software only works on Windows!):
SpikeGLX (data acquisition software), unpack it in “C:SpikeGLX”
PXI Enclustra Drivers for your specific OS version (scroll down to locate the appropriate file)
NI Package Manager (in case you ever get a NI-DAQ or some other NI device worth controlling)
To make SpikeGLX functional (once the module and card are connected, and probe is connected to the chassis):
put the probe configuration directories in “C:SpikeGLXRelease_vXXXXXXXX-phaseXXSpikeGLX_Calibration”
Download firmware for your specific SpikeGLX version, open the SpikeGLX Console and navigate to Tools > Update IMEC Firmware, select the slot you are using and:
load BS firmware from, e.g., “C:SpikeGLXRelease_vXXXXXXXX-phaseXXFirmware”
load BSC firmware from, e.g., “C:SpikeGLXRelease_vXXXXXXXX-phaseXXFirmware”
Setting up usv-playpen
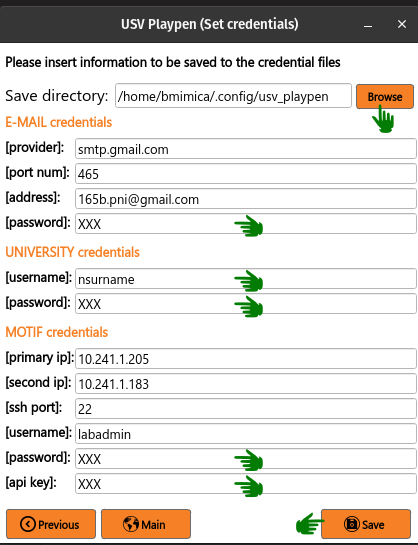
If you plan to conduct behavioral recordings and/or send/receive e-mail notifications when jobs start/complete, you need to create and configure 3 credential files:
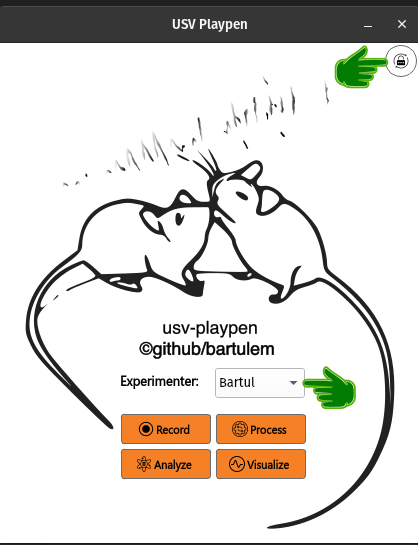
You do this by selecting a Save directory and filling out the form loaded in the window. After you are done, just click the Save button (you over-write an existing file the same way):
Linux / Wayland (COSMIC)
On Linux desktops running a Wayland (the Wayland display-server protocol) compositor – notably Pop!_OS COSMIC (the Pop!_OS COSMIC desktop)
– the GUI’s native-Wayland window handling can misbehave: the fixed-size
windows shrink when refocused, and the terminal prints harmless
qt.accessibility.atspi warnings. Run the GUI through XWayland (the XWayland X11-compatibility layer) instead,
which restores the traditional fixed-size window behaviour and silences those
warnings, by exporting before launch:
export QT_QPA_PLATFORM=xcb
Add that line to your shell profile (~/.bashrc or ~/.zshrc) so it applies
to every session, then run usv-playpen as usual. Window maximize / fullscreen
(which COSMIC permits regardless of the app’s fixed-size hints) is in any case
reverted to the fixed size automatically on Linux, and the dock / app-grid icon
is installed on first launch.
Configuration files
Everything usv-playpen reads at start-up that is not a per-run settings file (the
*_settings.json files documented in Process, Analyze,
Visualize and Modeling) lives in src/usv_playpen/_config/. Most are
meant to be edited to match your rig; a few are bundled data assets you will rarely
touch. Grouped by role:
Plotting / GUI appearance
usv_playpen.mplstyle— the matplotlib style applied to every generated figure and video throughapply_plot_style(font family, per-role font weights, font / label sizes, colors, figure size and DPI). Edit it to restyle all plots at once; the default font is Helvetica Light. Per-callfontweight=/color=arguments still override it.gui_style_sheet.css— the Qt style sheet that themes the GUI window itself (loaded at launch). Edit to restyle the application chrome.
Acquisition / recording (only needed if you run experiments from this machine)
behavioral_experiments_settings.toml— the experiment-run settings: experimenter list + default, the Avisoft RECORDER and CoolTerm install paths, the Arduino sync COM port, the credentials directory, file server, recording / calibration durations and the Ethernet toggle. This is the main file to edit before recording.equipment.toml— a description of the rig hardware / software (triggerbox, cameras, lenses, acquisition PCs, the Avisoft device). Update it to describe your own equipment.avisoft_config.ini— the Avisoft RECORDER USGH configuration exported from the Avisoft software and mirrored by usv-playpen to drive audio recording. Re-export it from Avisoft whenever you change microphone / recording settings.coolterm_config.stc— the CoolTerm serial-terminal profile (COM port, 9600 baud …) used to talk to the Arduino sync board.calibrated_sample_rates_imec.ini/calibrated_sample_rates_nidq.ini— the measured true sample rates of each Neuropixels headstage (imec, ≈ 30 kHz keyed by probe serial) and NI-DAQ device (nidq). Replace these with your own calibration values.
Session metadata
_metadata.yaml— the per-session metadata template (institution, lab, experimenter, session id / duration / description, USV counts, keywords …). It is copied and filled in for each session; edit the template to change the default fields.
Tracking skeletons
mouse_skeleton.json/playpen_skeleton.json— the SLEAP (the SLEAP pose-tracking framework) / Anipose (the Anipose 3-D triangulation library) node-and-edge skeletons for the mouse body and the arena calibration board, consumed by the 3D triangulation. Only edit these if you change the tracked keypoints or the arena.
Bundled data assets (rarely edited)
spike.wav— the short spike-sound clip mixed into behavioral videos when the spike-sound option is enabled.usv_latent_embedding_segmentation.npz— the precomputed QLVM (the in-house quasi-Monte Carlo latent variable model) latent-embedding watershed segmentation (the watershed segmentation algorithm) used to render the neuronal-tuning figures.