Requirements
This page explains how to set up your equipment and PCs before using the usv-playpen GUI for behavioral recordings.
Hardware Requirements Audio recording essentials ^^^^^^^^^^^^^^^^^^^^^^^^^^
Dell Precision 3680 Tower Intel(R) Core(TM) i9-1900 CPU @ 2.00 GHz and 64 GB RAM (1x)
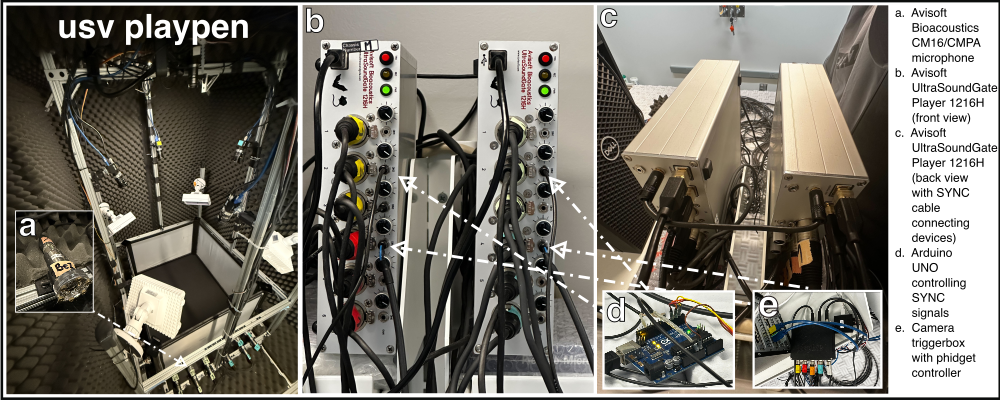
Avisoft UltraSoundGate Player 1216H (comes with SYNC cable) (2x)
Avisoft 40011 CM16/CMPA microphones (come with XLR-5 extension cables) (24x)
Sound permeable mesh (10ft)
Video recording essentials
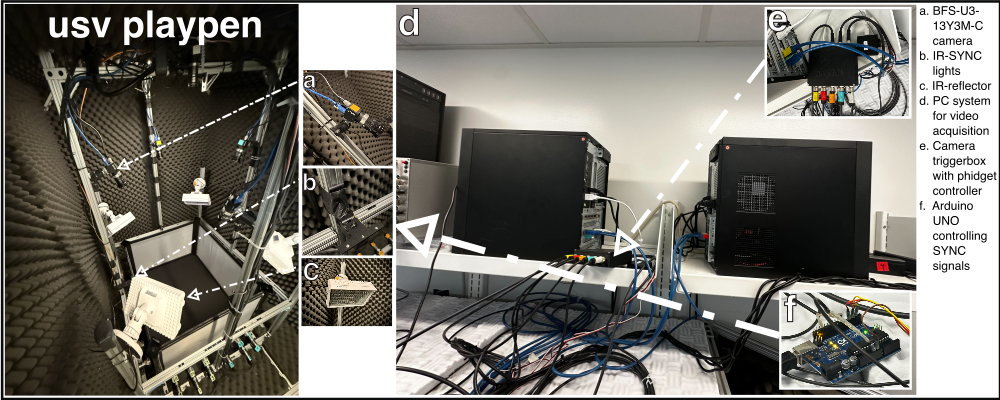
BFS-U3-13Y3M-C (5x)
Overhead lens 8mm or 8.5mm lens for 1/2” sensors HF8XA-5M (1x)
Light phidget (1x)
Loopbio Triggerbox with 5 Trigger Ports and 8 State Ports (1x): comes with Binder (3-pole) connectors for triggering cameras (5x), and Binder (6-pole) connectors for synchronization with external hardware (3x)
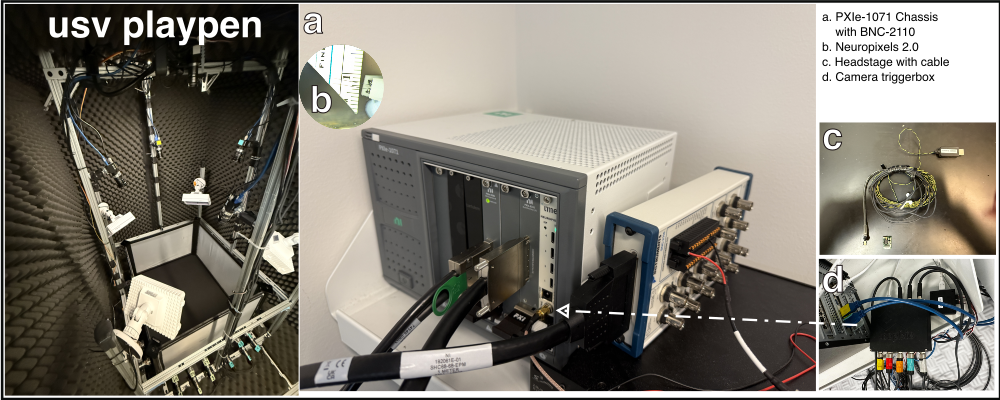
E-phys recording essentials
Other essentials
Arduino Uno (1x)
IR-LEDs (3x)
IR-reflectors (4x)
Raspberry Pi 4b (1x)
HiFiBerry DAC2 PRO (1x)
SA1 Stereo Amplifier (1x)
3.5mm Female Jack to Bare Wire Open End TRS 3 Pole Stereo 1/8” 3.5mm (1x)
BNC Male Balun Connector to 2 Screw Camera Terminal Male Adapter (1x)
Magnets for earbud mount (10x)
Intel Ethernet Converged X710-DA2 Network Adapter (X710DA2) for high speed ethernet (2x)
Intel E10GSFPSR 10G SFP+ SR SFP for high speed ethernet (2x)
Software Requirements
Audio PC essentials
Whatever operating system you are using, you will need to ensure the existence of the following software prior to using usv-playpen: (1) git (and add PATH to USER VARIABLES on Windows), (2) uv (and add PATH to USER VARIABLES on Windows).
You can verify that the installation was successful by running the following commands in the terminal:
git --version
uv --version
Avisoft Recorder USGH works on Windows 11. You should download a version of the software that does not require an USB license key. There is a known issue that the configuration file can occasionally contain invalid settings that lead to various unexpected behaviors. This potential issue can be avoided by disabling the automatic saving of the configuration when the program is closed (Options > Configuration management > Save mode on exit > Save current configuration automatically). CoolTerm is a serial port terminal application, which allows you to record and keep Arduino print statements in the form of a text file. In the usv-playpen/_config directory, you can find a CoolTerm configuration file, coolterm_config.stc, which you can import into CoolTerm. If you are setting CoolTerm up for the first time, it is best to unpack it in D:\CoolTerm and further create two directories: D:\CoolTerm\Connection_settings (place the coolterm_config.stc file here) and D:\CoolTerm\Data. Open the config file in CoolTerm and ensure that the location of saved files is D:\CoolTerm\Data and not D:\CoolTerm. An additional important point to consider is which port to set it to (by default it is set to COM5). If you are using the existing Arduino UNO, it is sufficient to plug it into a port (ideally COM5, which would require no changes to the CoolTerm configuration file), as the sketch was already uploaded. However, if you want to upload the sketch to a different Arduino device, you will need to install the Arduino IDE, compile and upload the following sketch: usv-playpen/other/synchronization/generate_sync_pulses.ino.
To control Ethernet connection status from the command line (more on this in the Record section), one needs to run Powershell in administrator mode. To ensure Powershell is in administrator mode all the time: (1) find Windows PowerShell in windows search and pin it to task bar, (2) right-click on the icon in the task bar and right click again on Windows PowerShell, (3) in the Properties, go to advanced properties and select run as administrator and hit OK. When you open PowerShell, it should say administrator in the title bar. To check if you are in administrator mode, type whoami and hit enter. If you are in administrator mode, it should say administrator. It is also important to check the the file server is mounted to the PC. You can check all the mounted file systems with the following command:
gdr -PSProvider 'FileSystem'
If the file server is not mounted, you can mount it with the following command:
net use f: \\cup\falkner /user:username@princeton.edu password /persistent:yes
net use m: \\cup\murthy /user:username@princeton.edu password /persistent:yes
One can also enable/disable the Ethernet connection with:
netsh interface set interface "ethernet_network_name" enable
Video PC essentials
There are two PCs running Ubuntu 18.04 LTS controlling camera acquisition with Motif. Three cameras are connected to the main PC, and two are connected to the secondary PC via the USB3 Micro-B Locking Cable. The main PC is connected to the Loopbio Triggerbox and each camera is connected to the Triggerbox via the 6-pin GPIO cables. If necessary, one can remote into each of the PCs using SSH. To do so, you need to know the password of the PC you want to connect to and have a stable VPN connection. You would connect in the following way:
ssh labadmin@pni-<MAIN_PC_ID>.princeton.edu
ssh labadmin@pni-<SECONDARY_PC_ID>.princeton.edu
If Motif is experiencing issues, it can be restarted on any PC with the following command:
sudo systemctl restart supervisor.service
but the user then needs to connect to the Motif web interface and manually ensure that all the cameras are connected and ready for recording.
Another thing that needs to be ensured prior to recording is that the file server is mounted to the PC. You can mount the file server with the following command:
//cup.princeton.edu/famousprof /mnt/famousprof cifs noauto,x-systemd.automount,credentials=/root/.credentials,iocharset=utf8,rw,file_mode=0664,dir_mode=0775,nolinux,noperm,vers=2.1 0 0
The video data is saved in /mnt/DATA of each computer.
EPHYS PC essentials
On the firmware/software side, install the following (note that SpikeGLX only works on Windows!):
SpikeGLX (data acquisition software), unpack it in “C:SpikeGLX”
PXI Enclustra Drivers for your specific OS version (scroll down to locate the appropriate file)
NI Package Manager (in case you ever get a NI-DAQ or some other NI device worth controlling)
To make SpikeGLX functional (once the module and card are connected, and probe is connected to the chassis):
put the probe configuration directories in “C:SpikeGLXRelease_vXXXXXXXX-phaseXXSpikeGLX_Calibation”
Download firmware for your specific SpikeGLX version, open the SpikeGLX Console and navigate to Tools > Update IMEC Firmware, select the slot you are using and:
load BS firmware from, e.g., “C:SpikeGLXRelease_vXXXXXXXX-phaseXXFirmware”
load BSC firmware from, e.g., “C:SpikeGLXRelease_vXXXXXXXX-phaseXXFirmware”
Setting up usv-playpen
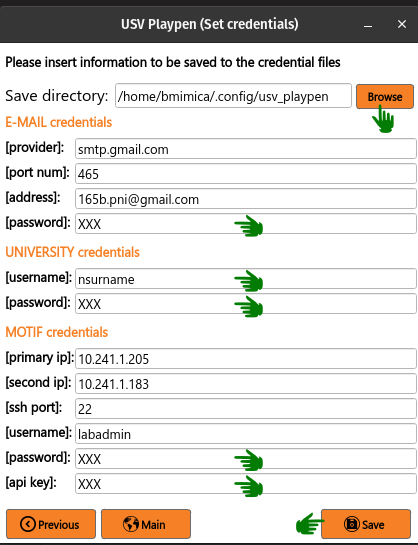
If you plan to conduct behavioral recordings and/or send/receive e-mail notifications when jobs start/complete, you need to create and configure 3 credential files:
You do this by selecting a Save directory and filling out the form loaded in the window. After you are done, just click the Save button: