Record
This page explains how to use the data recording functionalities in the usv-playpen GUI.
Before starting the GUI, make sure you activated the virtual environment in the administrator Powershell.
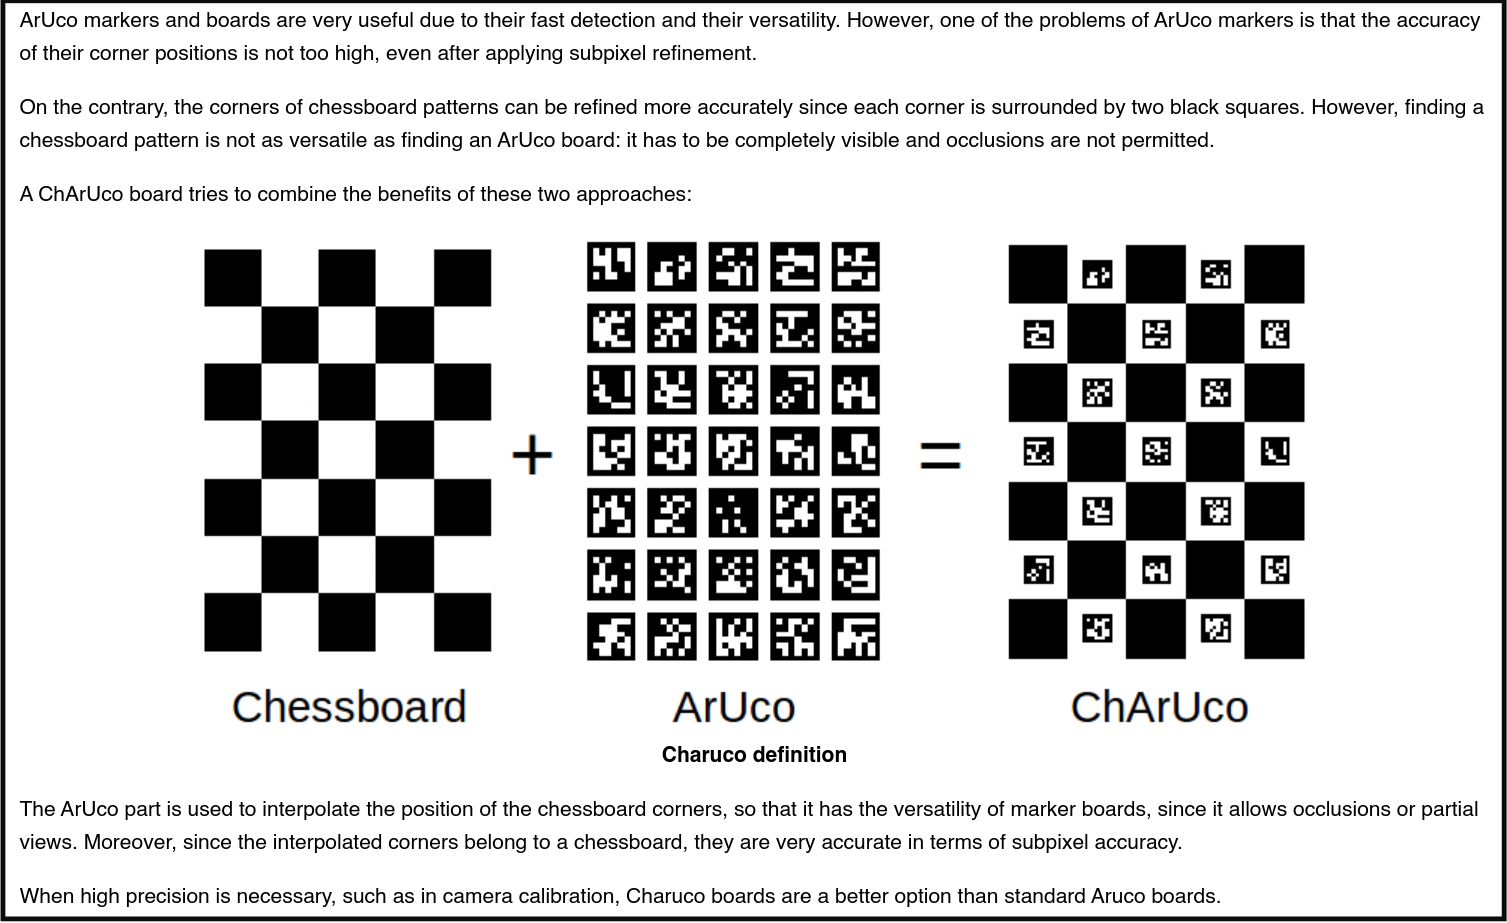
Calibrate (introduction) In usv-playpen, camera calibration has a two-fold purpose: (1) learning the spatial relationship between the used cameras, (2) capturing positions of microphones and arena corners.
In order to reconstruct mouse body key-points in 3D, the spatial relationship between the cameras must first be determined. This is done by displaying a ChArUco board in the field of view of all cameras, ideally in at least several orientations, and then calculating the reprojection error of specific markers.
A brief introduction on the uses of ChArUco boards can be found here.
Calibrate (preparation)
Create a ChArUco board
OpenCV provides a function to create a ChArUco board. This is implemented through SLEAP-Anipose and available in the GUI. A thing to consider is the size of the board. The larger the board, the more markers it contains, and the more accurate the calibration will be. The user is responsible for printing the board and attaching it to a flat surface. By default, the board has the following characteristics (found in /usv-playpen/_parameter_settings/process_settings.json):
"calibrate_anipose": {
    "board_provided_bool": false,
    "board_xy": [
      8,
      11
    ],
    "square_len": 24,
    "marker_len_bits": [
      18.75,
      4
    ],
    "dict_size": 1000,
    "img_width_height": [
      2100,
      2970
    ]
  },
Clear arena and position IR-markers
Arena corners are fitted with four laser-cut acrylic parts that are proped vertically to discourage mice from climbing up. Each part is a three-piece design consisting of the main vertical piece, a top cover and screw that secures the top to the vertical rail. Secured parts should not wobble when you apply perpendicular pressure. It should press tightly against the floor plate. You can remove these parts by loosening the screws and removing the pieces one by one. Try not to push any of these acrylic parts against the floor while removing, since they can break.
After removing the corner parts, each of the four mesh barriers can be slid out from the metal frame by gently pulling up (you can bend them slightly to avoid obstacles like SYNC LEDs). The important consideration in this process is to remain mindful of camera positions, such that you avoid bumping into them, as changing camera positions will require a new calibration procedure.
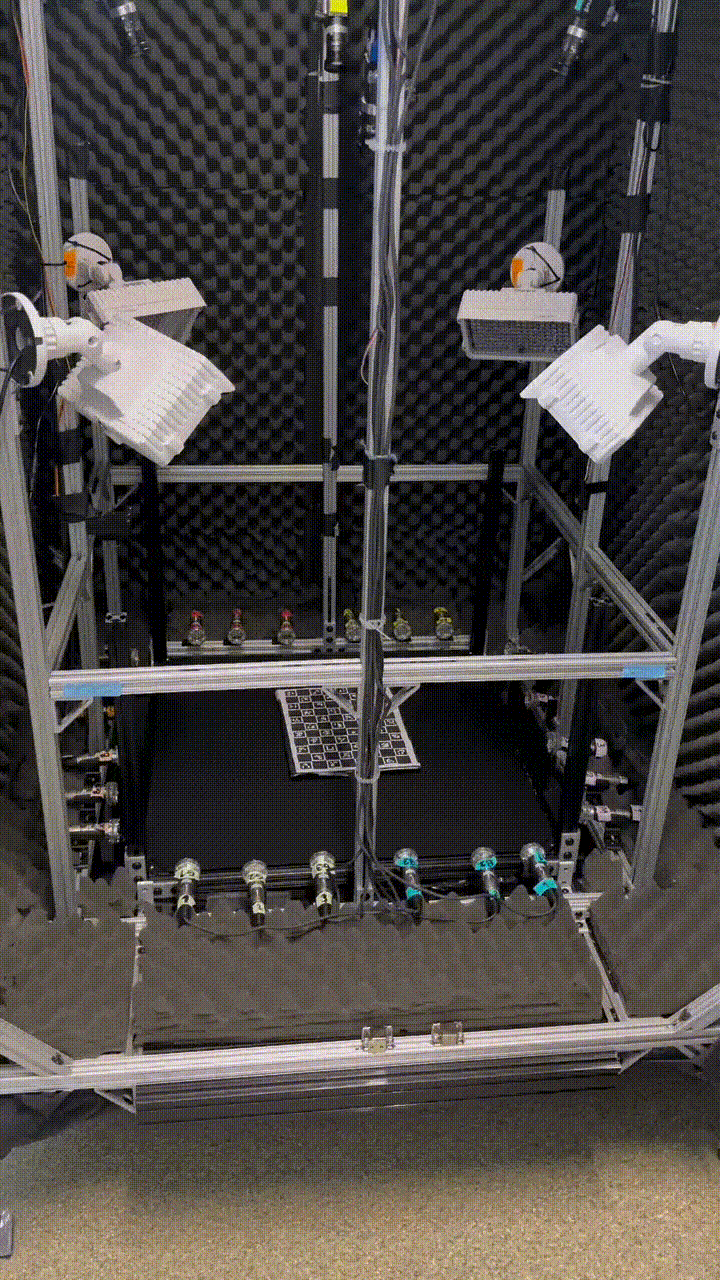
The objective of this process is to improve the range of the ChArUco board and to enable microphone visibility. Tracking microphone positions is necessary for localizing sound sources, and tracking arena corners helps us establish the boundaries of the environment. To simplify tracking of the corners, which may not be visible to the cameras, we use IR-retroreflective markers. One can place four half-spherical retroreflectors to four corners of the arena (see example video above): they now establish the approximate boundary of the arena.
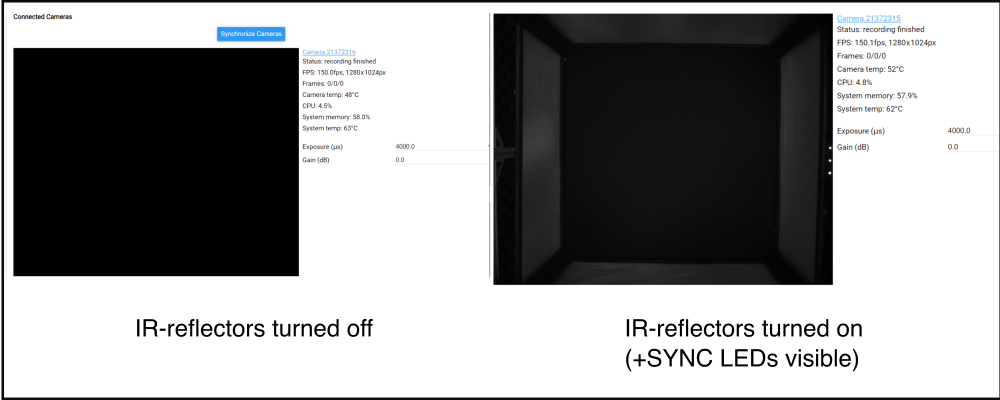
To expedite execution, place the physical ChArUco board inside the arena (see example video above), and check that all IR reflectors are turned on: you want to make sure they are pointing roughly into the center of the arena. Finally, check camera availability and visibility in the Motif web interface (see image below for comparison).
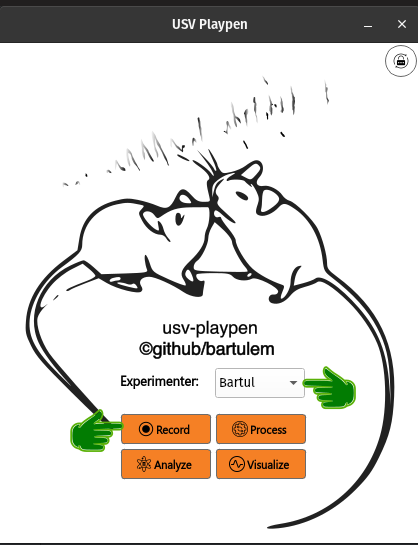
Calibrate (execution) In the GUI main window, select an experimenter name from the dropdown menu and click Record:
Should you require a name that is not present in the loaded list, you can manually add it to /usv-playpen/_config/behavioral_experiments_settings.toml to the very top variable experimenter_list (NB: be sure to leave a trailing comma at the end). Depending on the choice of experimenter name, you can see file server directory destinations of files created during recording. You can naturally change these settings as you please. Several important details, however, are present in the section below. For a camera Calibration session, we choose not to conduct an audio recording, but to conduct video calibration. By default, calibration duration is 3 minutes long and the recording of the empty arena after it is 1 minute long, but these are arbitrary and should be adjusted to particular needs. For calibration purposes, it is not necessary to disable the ethernet connection:
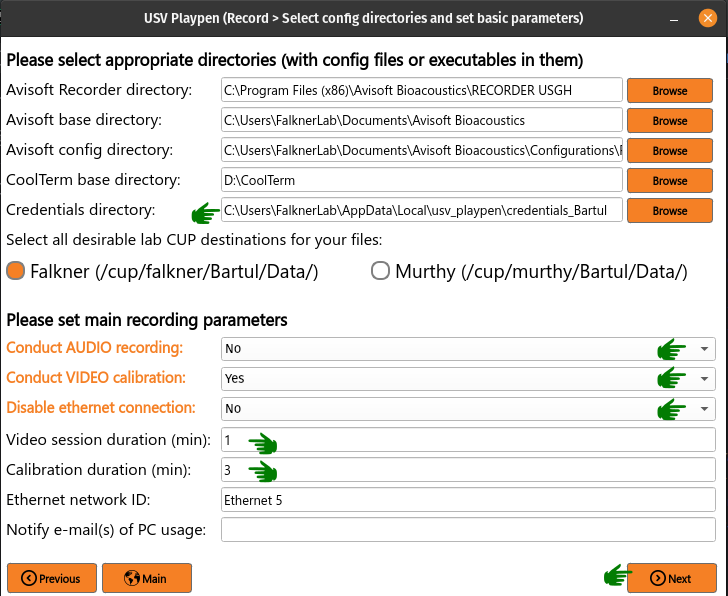
One can skip the Audio Settings section as it is not relevant here, and adjust Video Settings. If the circular checkboxes are orange, it means those specific cameras will be used for calibration. The most meaningful parameter for calibration is the camera recording frame rate. By default, it is set to 10 fps, but you can use the slider to choose the acquisition frame you desire. The 10 fps frame rate is set by default because lower frame rates provide better board detection performance:

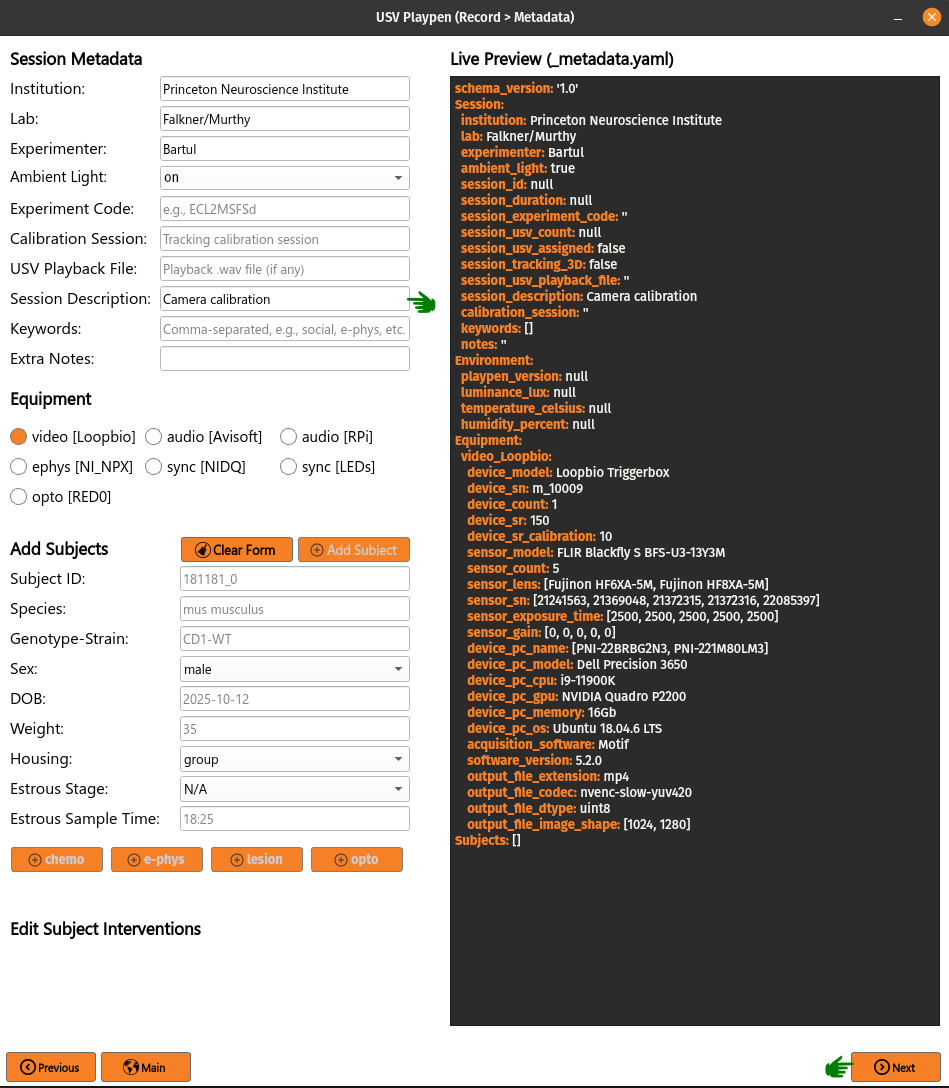
In the Metadata section, under Session Description, you can put “Camera calibration”, select the “video [Loopbio]” checkbox only, and click Next:
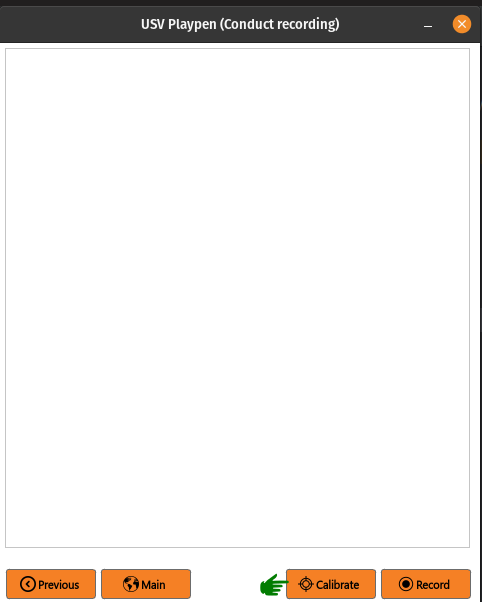
Finally, when ready to head over to the arena and move the calibration board, simply click the Calibrate button. You have several seconds before the video starts recording:
The video below is a sped-up version of an actual calibration and can be consulted for reference.
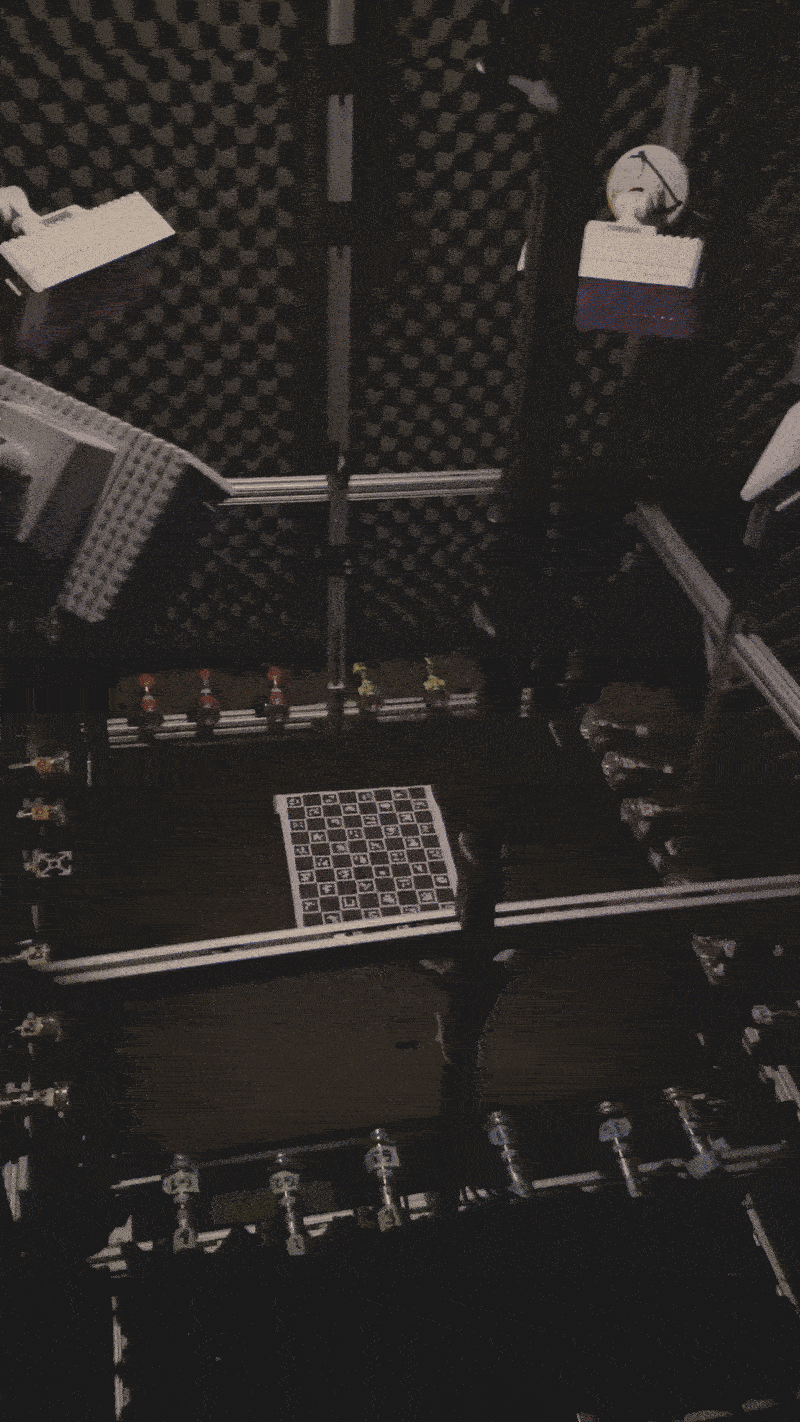
It is good practice to be thorough and move the ChArUco board around the arena, so that all cameras can see it. The more markers are visible to the cameras, the better the calibration will be. You can also rotate the board in your hands to ensure that all markers are visible from different angles. The calibration process is not very sensitive to the distance of the board from the cameras, but it is important to keep it in focus.
Make sure you cover all sides and corners, but also move the board slightly in the vertical dimension, without moving too far from the floor. Change the angle of the board relative to the cameras freely, but keep in mind that extreme orientations may not be captured by the cameras at all. Moving the board over the microphones is not problematic, as long as it is not out of the range of the cameras or displacing the microphones.
When Calibration is complete, you can leave the board on the floor and click the Record button, which will capture a minute long video of the empty arena. You do not want to move around in the arena space during this recording. Upon completion, the data will be copied over to the directories/fileserver(s) you selected previously, e.g., F:/Bartul/Data/20250430_141750 and there will be two subdirectories: sync and video. In the video subdirectory, you will find Nx (N = number of cameras) calibration subdirectories (containing 5 minute calibration videos) and Nx recording subdirectories (containing the 1 minute video post calibration).
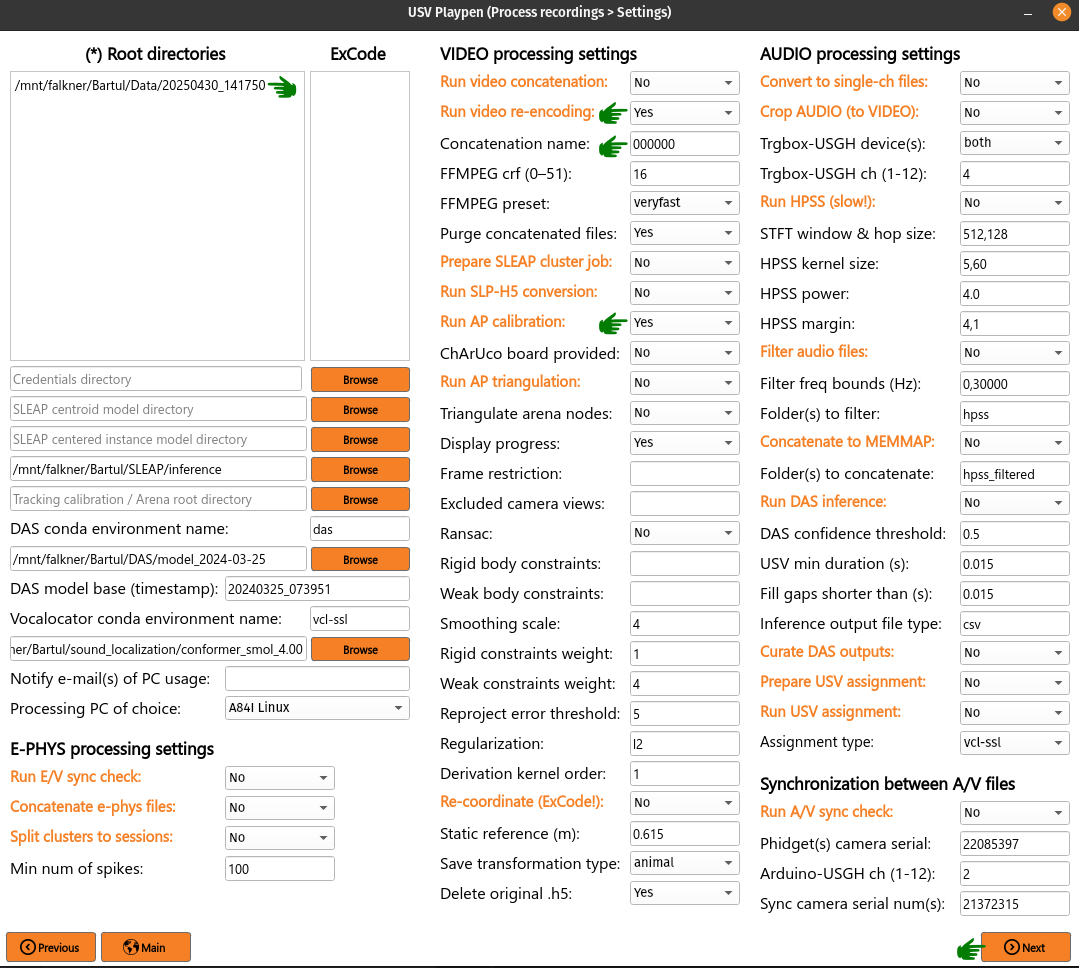
Calibrate (assessment) To assess the quality of the calibration, you first click the Process button on the GUI main display:
In the Root directories for processing window, either write or c/p the path to the directory of the calibration session you just recorded. Select Run video re-encoding and change the Concatenation name to 000000. Finally, select Run AP Calibration. Hit Next, and Process. In the terminal/powershell, you should be able to see the amount of CharUco Boards detected by reprojection on each camera, as progress bars will appear.
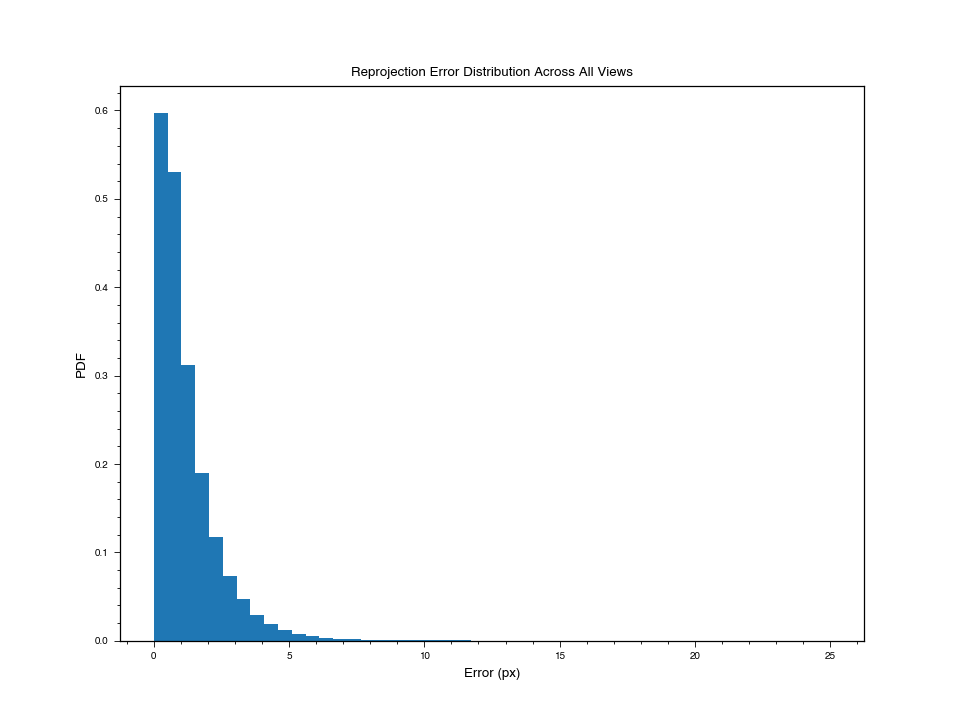
When Calibration is done, if you navigate to, e.g., F:/Bartul/Data/20250430_141750/20250430141750/video, you will find, among others, a 20250430141750_calibration.toml file and a 20250430141750_reprojection_histogram.png file. The histogram should display the reprojection error diminishing steeply with pixel number (see image below for example), highly suggestive of an effective calibration.
Record (general settings) Firstly, you want to remove the retro-reflective markers, install the screen doors, and secure four corners with custom covers. Check that IR-reflectors are all connected, and the overhead light is turned to warm light and that its intensity is low. If necessary, also clean the surface of the floor the animals walk on. When ready for recording, USGH devices will have their green light on and the yellow light blinking. In the Motif web interface, you should see all cameras connected.
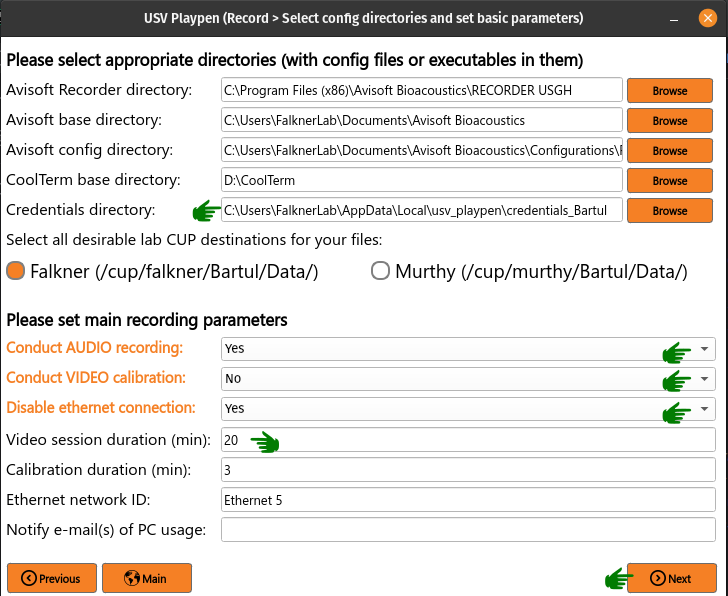
In the GUI main window, select an experimenter name from the dropdown menu and click Record:

On the next page, you can set some basic parameters:
Avisoft Recorder directory : this is the directory which contains the rec_usgh.exe file
Avisoft base directory : this is the local directory where the recordings will be saved
Avisoft config directory : this is the local directory where the Avisoft config file is located (must be on C:\ drive!)
Coolterm directory : this is the local directory where the Arduino serial terminal outputs will be saved
File destination(s) Linux : these are the directories on both video PCs where the file server is mounted
File destination(s) Windows : these are the directories on the audio PC where the file server is mounted
Conduct AUDIO recording : if Yes, the audio recording will be conducted; if No, only video will be recorded
Conduct VIDEO calibration : if Yes, the video calibration will be conducted
Disable ethernet connection : if Yes, the ethernet connection will be disabled during the recording
Video session duration (min) : total duration of the video recording session (audio starts ~10 s before, and ends ~10 s after)
Calibration duration (min) : duration of the calibration session
Ethernet network ID : this is the ID of the ethernet network
Notify e-mail(s) of PC usage : this is the e-mail address that will be notified of the start and end of PC usage
The file-destination directories above are derived from the [[lab_shares]] table near the top of behavioral_experiments_settings.toml, which records how this host mounts the lab CUP shares (it is also read by os_utils and the processing code). Each entry stores only the per-platform tokens, not full paths:
name : the share name (e.g.
falkner,murthy); it is appended to the mount parent to form each full root, and is also used as\\<file_server>\<name>windows : the drive letter the share is mapped to on Windows (a
:is appended automatically)darwin / linux / cluster : the mount parent directory under which the share appears on macOS, Linux, and the compute cluster respectively
The first [[lab_shares]] entry is the default returned by find_base_path. To remap a drive or mount point, edit the relevant token here.
In the example below, one would be doing a 20 minute audio and video recording without calibration. When ready, click Next:
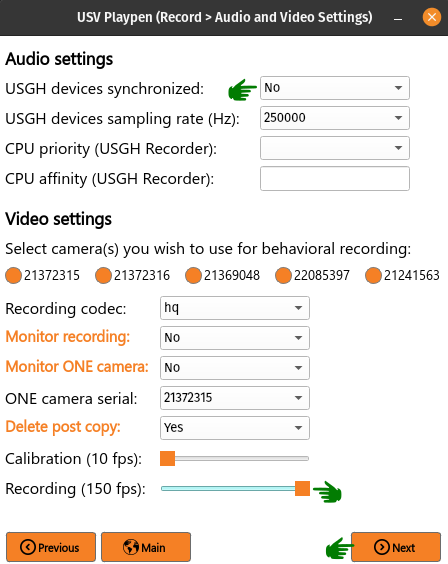
Record (audio and video settings)
In the Audio Settings section, you can set certain parameters for the audio recording. Avisoft Recorder USGH has a relatively complex set of options and using the default ones is probably best because they provide the best stability, Should you wish to change other parameters, you can do this manually in the behavioral_experiments_settings.toml file, located in the _config directory. Otherwise, in the GUI you can choose to modify the following four:
USGH devices sync: audio devices operate in SYNC mode or separately
USGH devices sampling rate (Hz): the sampling rate of USGH devices (by default 250 000 Hz)
CPU priority: Windows option that regulates resource management based on the importance of the process
CPU affinity: Windows option that sets the CPU core on which the process will run
In the Video Settings section, you can also set certain parameters for the video recording, while others (most notably, camera exposure time and gain) need to be set manually in the behavioral_experiments_settings.toml file. In the GUI, you can set the following parameters for the video recording:
Camera(s) to use : check (orange) serial numbers of cameras you want to use in the recording
Recording codec : this is the codec (video quality) you want to use for the recording
Monitor recording : if Yes, monitor recording on this PC (incompatible with disabling ethernet!)
Monitor ONE camera : If Yes, monitor only one camera in browser
ONE camera serial : if monitoring one camera, this is the serial number of the camera you want to monitor
Delete post copy : if Yes, the video files will be deleted from the video PCs after copying to the file server
Recording fps : use slider to set recording frame rate (fps) of the cameras (total range is 10-150 fps)
In the example below, one would be using all 5 cameras, a “hq” codec and a 150 fps capture rate, with no monitoring of the recording. Also, one would be setting the Audio Recorder USGH to run devices separately, at 250 kHz each, with no CPU priority or affinity options activated. When ready, click Next:
Metadata
The experiment metadata is saved in a YAML file with the following basic structure:
schema_version: '1.0'
Session:
  institution: Princeton Neuroscience Institute
  lab: Falkner/Murthy
  experimenter: Bartul
  ambient_light: true
  session_id: null
  session_duration: null
  session_experiment_code: ''
  session_usv_count: null
  session_usv_assigned: false
  session_tracking_3D: false
  session_usv_playback_file: ''
  session_description: Camera calibration
  calibration_session: ''
  keywords: []
  notes: ''
Environment:
  playpen_version: null
  luminance_lux: null
  temperature_celsius: null
  humidity_percent: null
Equipment:
Subjects: []
The metadata file has 4 main sections: Session, Environment, Equipment and Subjects. The Session section contains information about the experimenter, session ID, duration, description, etc. The Environment section contains information about the experimental environment, such as ambient light, temperature, humidity, etc. The Equipment section contains information about the equipment used in the experiment (e.g., audio, video, ephys, sync, opto). The Subjects section contains information about the subjects used in the experiment and all interventions associated with each subject (e.g., chemogenetic or optogenetic manipulations, e-phys implants, lesions, etc.).
In the Metadata window, you can change parameters associated with each section and observe live changes to the document on the right:

It is worth noting that you can also manually modify the equipment settings in the _config/equipment.toml file. Should you add further equipment to the list, note that it should be structured as [equipment type.name]:
[video.Loopbio]
device_model = 'Loopbio Triggerbox'
device_sn = 'm_10009'
device_count = 1
device_sr = 150
device_sr_calibration = 10
sensor_model = 'FLIR Blackfly S BFS-U3-13Y3M'
sensor_count = 5
sensor_lens = ['Fujinon HF6XA-5M', 'Fujinon HF8XA-5M',]
sensor_sn = [21241563, 21369048, 21372315, 21372316, 22085397,]
sensor_exposure_time = [2500, 2500, 2500, 2500, 2500,]
sensor_gain = [0, 0, 0, 0, 0]
device_pc_name = ['PNI-22BRBG2N3', 'PNI-221M80LM3']
device_pc_model = 'Dell Precision 3650'
device_pc_cpu = 'i9-11900K'
device_pc_gpu = 'NVIDIA Quadro P2200'
device_pc_memory = '16Gb'
device_pc_os = 'Ubuntu 18.04.6 LTS'
acquisition_software = 'Motif'
software_version = '5.2.0'
output_file_extension = 'mp4'
output_file_codec = 'nvenc-slow-yuv420'
output_file_dtype = 'uint8'
output_file_image_shape = [1024, 1280]

[audio.Avisoft]
device_model = 'UltraSoundGate 1216H'
device_count = 2
device_sn = ['1216H/33', '1216H/26',]
device_sync = false
device_sr = 250000
sensor_model = 'CM16/CMPA'
sensor_count = 24
device_pc_name = 'PNI-DRMDK74'
device_pc_model = 'Dell Precision 3680'
device_pc_cpu = 'i9-14900'
device_pc_memory = '64Gb'
device_pc_os = 'Windows 11 Pro'
acquisition_software = 'USGH Recorder'
software_version = '4.4.2.26'
output_file_extension = 'wav'
output_file_dtype = 'int16'

[audio.RPi]
device_pc_name = 'usv-replay'
device_pc_model = 'Raspberry Pi 4'
device_pc_cpu = 'Broadcom BCM2711'
device_pc_memory = '4Gb'
device_pc_os = 'Raspberry Pi OS'
device_sn = '100000005c5e21a6'
device_amplifier = 'TDT SA1 Stereo Amplifier'
device_sound_card = 'HifiBa=erry DAC2 HW1.2'
speaker_model = 'Sony MDREX15LP/B'

[ephys.NI_NPX]
device_model = 'PXIe-1071'
device_sn = '326047E'
device_count = 1
cable_bool = true
cable_vendor = 'imec'
hs_vendor = 'imec'
probe_vendor = 'imec'
device_pc_name = 'PNI-22DYL5GT3'
device_pc_model = 'Dell Precision 3660'
device_pc_cpu = 'i7-12700K'
device_pc_memory = '64Gb'
device_pc_os = 'Windows 11 Pro'
acquisition_software = 'SpikeGLX'
output_file_extension = 'bin'
output_file_dtype = 'int16'

[sync.NIDQ]
device_model = 'BNC-2110'
device_sn = '115290C'
device_sr = 62500.72887
device_pc_name = 'PNI-22DYL5GT3'
device_pc_model = 'Dell Precision 3660'
device_pc_cpu = 'i7-12700K'
device_pc_memory = '64Gb'
device_pc_os = 'Windows 11 Pro'
acquisition_software = 'SpikeGLX'
output_file_extension = 'bin'
output_file_dtype = 'int16'

[sync.LEDs]
device_model = 'Arduino Uno R3'
device_sn = '55736303931351408130'
device_br = 9600
device_sketch_name = 'generate_sync_pulses.ino'
device_pc_name = 'PNI-DRMDK74'
device_pc_model = 'Dell Precision 3680'
device_pc_cpu = 'i9-14900'
device_pc_memory = '64Gb'
device_pc_os = 'Windows 11 Pro'
acquisition_software = 'CoolTerm'
software_version = '2.4.0'
output_file_extension = 'txt'

[opto.RED0]
device_vendor = 'SLOC'
device_model = 'RLM635TA-100FC'
device_sn = 'RI02S10775'
device_max_power = 500
device_wavelenght = 634.2
patch_cord_vendor = 'Doric'
patch_cord_model = 'FCM-MF1.25_LAF'
patch_cord_sn = 'P115017-01'
patch_cord_NA = 0.57
patch_cord_core_diameter = 400
fiber_vendor = 'MBF Bioscience Neurophotometrics'
fiber_length = 6
fiber_NA = 0.39
fiber_core_diameter = 200
fiber_ferrule_diameter = 1.25
device_pc_name = 'PNI-9828mc4'
device_pc_model = 'Dell Pro Max Slim FCS1250'
device_pc_cpu = 'Intel Core Ultra 9 Processor 285'
device_pc_gpu = 'NVIDIA RTX 2000 ADA'
device_pc_memory = '64Gb'
device_pc_os = 'Windows 11 Pro'
Clicking Next saves all your settings to the /_config/behavioral_experiments_settings.toml and /_config/_metadata.yaml files. You should also observe how upon starting another recording, all settings which you set previously will be automatically loaded. When the mice are in the arena and the doors are closed, click Record:

The process starts with modifying the audio config file and enabling a CoolTerm process (the window will be minimized!). After this, the Avisoft Recorder should start within 10 seconds, and if it is working - a video recording will be initiated and ethernet will be disconnected during the chosen duration. You can monitor the video recording on another computer. When the time is up, video recording will stop, followed by audio recording, followed by CoolTerm. Ethernet will be reconnected and a file transfer procedure initiated. You will be notified when the file transfer procedure for the primary file server is completed.
Record (common issues) Audio PC restart (signaled by a lock screen, as sleep is disabled) can inadvertently change identities of the main and secondary USGH device. It is therefore good practice to check whether this had occurred before recording. When you locate the USGH devices, the main one will be labeled with “M”, but both device will be receiving digital inputs on channels 2 (SYNC signal) and 4 (Triggerbox signal). If you start data acquisition in the Avisoft Recorder, it will be hard to tell whether a device switch had occurred, given that the inputs observe the same pattern across devices. A quick way to check this is to pull one of the digital inputs from the “M” device out and check whether the digital input disappeared from the presumed “M” device (channels 1-12), or the presumed “S” device (channels 13-24). If the former is the case, everything is functioning as it should. If the latter is the case, one needs to disconnect all six USB cables (3 from device “M”, 3 from device “S”) connecting to the audio PC. The approach then is to first connect the three “M” cables, and then after a brief pause (10-20 s) to reconnect the other three. One should keep checking the order of devices until the problem is resolved. It is also important to check the the file server(s) is/are mounted to the PC.
When audio recordings are initiated, the GUI will wait ten seconds and then check whether the rec_usgh.exe process is running and if it is not frozen or crashed, it will initiate the video recording.
However, even with these precautions, in either sync or no-sync mode, detecting screen freezes might still fail. Moreover, channel mixing in the form of incorrect channel arrangement in the sync mode operating scheme (easily identifiable by recognizing digital inputs on the wrong channels) can occur upon starting the recording, which is a problem because it needs to be fixed manually. If any of such scenarios occurs, you should do the following:
click the Stop button in the Motif web interface (which stops video recordings)
close the Avisoft Recorder USGH application (force quit if necessary)
delete any remaining audio files in local directories (not strictly necessary, but good practice)
beware that any residual video files will be copied to next recording’s directory and you will have to delete them manually (necessary so make a note!)